Linux File Permissions and User Management Explained
Student Vocation Cybersecurity Learning Series — Lesson 13 of 30
Welcome to Lesson 13 of the Student Vocation Cybersecurity Learning Series!
In the previous lessons, you learned Linux fundamentals and essential terminal commands. In this lesson, we will examine how Linux controls access to files and directories.
Imagine that several people share the same computer. One person needs to read a report, another needs to update it, and a third should not be allowed to open it at all. Linux provides permissions, user accounts, and groups to help control these situations.
These controls are important in cybersecurity because poorly configured access can expose sensitive information or allow unauthorised changes.
By the end of this lesson, you should be able to:
- Explain Linux users, groups, and file ownership.
- Understand read, write, and execute permissions.
- Interpret common permission strings.
- Use ls -l to inspect file permissions.
- Practise changing permissions safely with chmod.
- Understand the purpose of chown, chgrp, and selected user-management commands.
- Explain the principle of least privilege.
-
What Is Linux File Permission?
A Linux file permission is a rule that helps determine which users can perform particular actions on a file or directory.
For ordinary Linux file-system permissions, access is commonly evaluated using three categories:
- Owner: The user identified as owning the file.
- Group: Users associated with the file’s group.
- Others: Users who do not match the owner or group categories.
Linux also supports additional access-control mechanisms, such as access control lists (ACLs), and some systems apply other security policies. Therefore, the basic permission string is important, but it is not always the whole access-control picture.
Permissions are useful for protecting:
- Private documents.
- Application configuration files.
- Scripts and programs.
- System logs.
- Shared directories.
- Sensitive data used by applications.
For example, a personal notes file may allow its owner to read and edit it while preventing other users from reading it.
-
Understanding Read, Write, and Execute Permissions
Linux uses three basic permission types, represented by letters.
Symbol |
Permission |
Meaning for a regular file |
Meaning for a directory |
| r | Read | Read the file’s contents | List directory entries, subject to other required access |
| w | Write | Modify the file’s contents | Create, remove, or rename entries, subject to other required access |
| x | Execute | Run the file as a program or script, if it is executable and otherwise permitted | Traverse or access entries within the directory when other requirements are satisfied |
| – | Not granted | The corresponding permission is absent | The corresponding permission is absent |
- Read permission (r)
For a regular file, read permission allows the user to read its contents.
Example: A student may be allowed to read a course note without being allowed to change it.
For a directory, read permission allows listing its entries, provided the user also has any other required permissions.
- Write permission (w)
For a regular file, write permission allows modification of the file’s contents.
For a directory, write permission is related to changing the directory’s entries. For example, creating, removing, or renaming files normally requires write and execute permission on the directory.
Important: The ability to delete or rename a file is mainly controlled by permissions on its parent directory, not just by the file’s own write permission. Other protections, such as the sticky bit, can also affect these operations.
- Execute permission (x)
For a regular file, execute permission allows it to be executed as a program or script, subject to other requirements.
For a directory, execute permission allows traversal through the directory and access to entries when the required permissions are satisfied.
For example, a user may need execute permission on each directory in a path to reach a file inside it.
-
How to Read Linux Permission Symbols
One of the most useful commands for understanding permissions is:
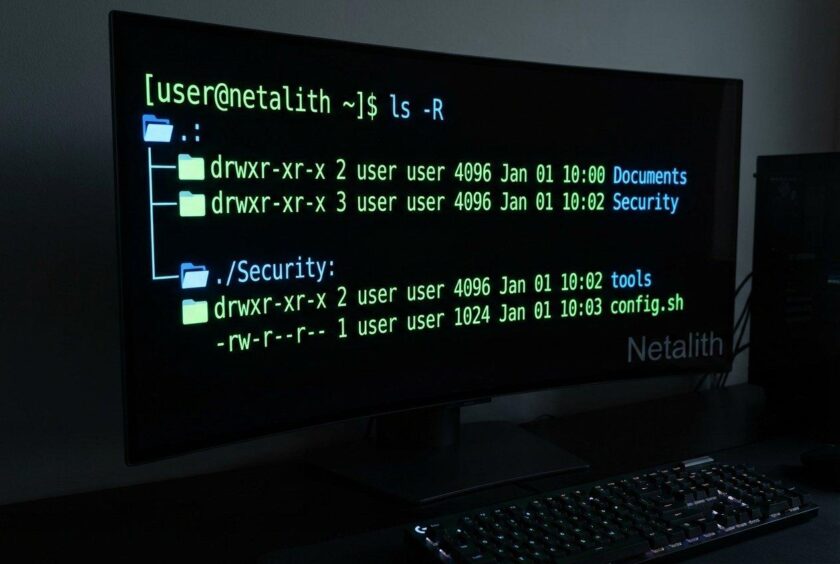
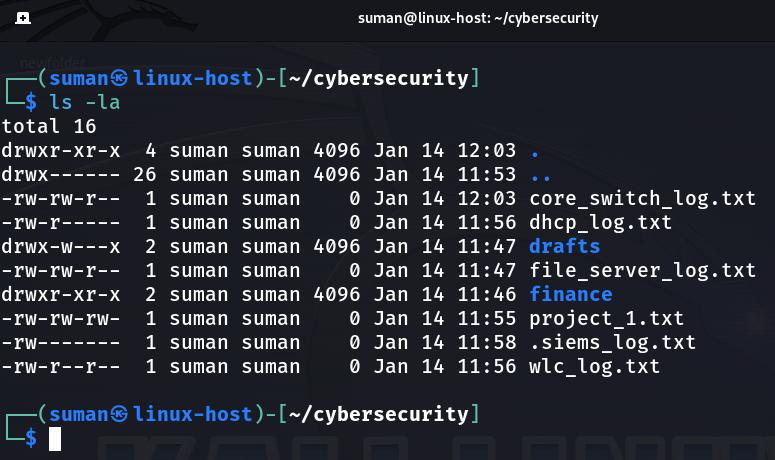
ls -l
It displays a detailed directory listing, including a permission string.
Suppose you see:
-rw-r–r– 1 student students 1200 Oct 20 10:00 notes.txt
The first part is:
-rw-r–r–
This contains a file-type indicator followed by three groups of permission symbols.
- The first character, -, indicates a regular file.
- The next three characters, rw-, represent the owner’s permissions.
- The following three, r–, represent the group’s permissions.
- The final three, r–, represent the permissions for others.
The example means:
- Owner: read and write.
- Group: read only.
- Others: read only.
The file-type character can have other values. A directory commonly begins with d, for example.
A directory listing can also display ownership, file size, modification time, and filename.
-
Understanding Numeric Permissions
Linux permissions can also be represented using numbers.
The basic values are:
Permission |
Numeric value |
| No permission (—) | 0 |
| Execute (–x) | 1 |
| Write (-w-) | 2 |
| Write and execute (-wx) | 3 |
| Read (r–) | 4 |
| Read and execute (r-x) | 5 |
| Read and write (rw-) | 6 |
| Read, write, and execute (rwx) | 7 |
The numbers are added together for each permission category.
For example:
- Read = 4
- Write = 2
- Execute = 1
- Read + write = 4 + 2 = 6
- Read + execute = 4 + 1 = 5
- Read + write + execute = 4 + 2 + 1 = 7
A three-digit mode represents the owner, group, and others, in that order.
Example: Permission 644
The permission 644 means:
- Owner: 6 = read and write.
- Group: 4 = read only.
- Others: 4 = read only.
In symbolic form:
rw-r–r–
Example: Permission 600
The permission 600 means:
- Owner: 6 = read and write.
- Group: 0 = no permissions.
- Others: 0 = no permissions.
In symbolic form:
rw——-
This is a common restrictive mode for a personal data file, although the appropriate setting depends on the file’s purpose and the system’s other access controls.
Example: Permission 755
The permission 755 means:
- Owner: 7 = read, write, and execute.
- Group: 5 = read and execute.
- Others: 5 = read and execute.
In symbolic form:
rwxr-xr-x
This is commonly used for executable directories and some programs. It is not a universal setting for every file.
-
What Is the chmod Command?
The chmod command changes a file’s or directory’s permission bits, subject to the user’s authority and the file system’s rules.
The name comes from “change mode.”
For safety, practise with files you create yourself rather than important system files.
- Set permissions using numbers
Create a sample file:
touch permission-demo.txt
Give the owner read and write permission while removing group and others’ permissions:
chmod 600 permission-demo.txt
Inspect the result:
ls -l permission-demo.txt
The permission string should normally begin with:
-rw——-
This means the owner has read and write permission, while group and others have no basic permissions.
- Set permissions using symbols
Symbolic permission changes use letters to identify the permission category and the action.
Common symbols include:
- u — owner, also called user.
- g — group.
- o — others.
- a — all three categories.
- + — add a permission.
- – — remove a permission.
- = — set the specified permissions for the selected category.
Examples:
chmod u+x script.sh
Adds execute permission for the owner of script.sh.
chmod g-r report.txt
Removes read permission from the group for report.txt.
chmod o-r secret.txt
Removes read permission from others for secret.txt.
chmod u=rw,go= secret.txt
Sets the owner’s permissions to read and write and removes the basic permissions from group and others.
These commands only work as intended when the target file exists and the current user has the necessary authority.
- Why chmod 777 is risky
You may encounter the command:
chmod 777 filename
It grants read, write, and execute permissions to the owner, group, and others for the selected file or directory.
This is often too permissive and may expose data or allow unwanted changes. Execute permission also has different implications for files and directories.
Do not use 777 as a routine solution to permission errors. Instead, identify which user or process needs access and grant only the permissions required.
-
Understanding File Ownership
Permissions work together with file ownership.
A file normally has:
- An owning user.
- An owning group.
For example, a listing might show:
-rw-r—– 1 alice finance 900 Oct 20 10:00 report.txt
In this example:
- alice is the owning user.
- finance is the owning group.
- The owner can read and write.
- The group can read.
- Others have no basic permissions.
Ownership can be important when a file is created by one user but needs to be accessed by a service or team.
- chown — Change Ownership
The chown command changes the owning user and, optionally, the owning group.
A general example is:
chown newowner filename
Changing ownership usually requires appropriate administrative authority or other permissions allowed by the system. Do not run ownership-changing commands against system files as a beginner.
For this lesson, learn the syntax and purpose rather than changing ownership on your actual computer.
- chgrp — Change Group Ownership
The chgrp command changes a file’s group ownership when the user has the required authority.
General example:
chgrp newgroup filename
Use these commands only on files and systems you are authorised to administer.
-
What Are Linux Users?
A Linux user account identifies an account under which processes can run and permissions can be evaluated.
A user account commonly has:
- A username.
- A numeric user ID (UID).
- A primary group.
- A home directory, depending on account configuration.
- A login shell or other configured account settings.
Linux systems also have service accounts used to run applications and background services.
Separating accounts helps prevent every program and person from needing unrestricted access to the whole system.
Useful commands for viewing your account
Run:
whoami
Displays the effective username for the current command session.
Run:
id
Displays the current user’s UID, primary group, and supplementary group information.
Run:
groups
Displays the groups associated with the current user.
These commands inspect account information and are suitable for beginner practice.
Viewing account records
Linux commonly stores local account information in /etc/passwd, while local group information is commonly stored in /etc/group.
For example, this command displays the current account record if a matching entry exists:
grep “^$(whoami):” /etc/passwd
The /etc/passwd file is not normally where users’ password hashes are stored. On modern Linux systems, password hashes are generally maintained separately in protected authentication files such as /etc/shadow.
Do not attempt to read protected authentication data or modify account files as part of this beginner exercise.
-
What Are Linux Groups?
A group allows permissions to be assigned to a collection of users.
For example, a company may have a group called developers for staff who need access to shared development resources.
Instead of configuring access independently for every user, an administrator can assign appropriate group ownership and permissions.
Groups can help organise access for:
- Development teams.
- System administrators.
- Shared training resources.
- Application services.
- Project folders.
Being a member of a group does not automatically grant unrestricted access. Access still depends on file permissions, directory permissions, and any additional security controls.
Viewing group membership
Run:
groups
This displays the groups associated with your current account.
Run:
id
This gives more detailed identity information, including numeric IDs.
Managing groups
Administrators may use commands such as groupadd, groupmod, and groupdel to manage local groups, depending on the Linux distribution and its account-management configuration.
These commands can affect real users and applications. They should be used only with appropriate authority and a clear understanding of the impact. They are not required for the practical lab below.
-
The Principle of Least Privilege
The principle of least privilege means giving each user, process, or application only the access necessary to perform its intended tasks.
For example:
- A student who only needs to read a course handout does not necessarily need permission to edit it.
- A service that reads a particular configuration file should not automatically have access to every user’s private documents.
- A normal user should not need administrative privileges for routine tasks such as listing files or reading personal notes.
Least privilege reduces the potential impact of mistakes, compromised accounts, and misused applications.
Why excessive permissions are dangerous
Overly broad permissions can:
- Expose confidential information.
- Allow unauthorised modification of files.
- Make shared folders easier to misuse.
- Increase the impact of a compromised account or process.
Good permission management balances security with the legitimate access users need to do their work.
-
What Is sudo?
The sudo command allows an authorised user to run a command with elevated privileges according to the system’s configuration.
For example, administrators may use it for approved maintenance tasks.
However, sudo is not required for most basic file-navigation and learning commands.
Do not add sudo to a command simply because it reports an error. First determine why the operation failed, whether you are in the correct directory, and whether the task genuinely requires additional authority.
For beginners, a separate practice environment and ordinary user account are safer places to learn.
-
Practical Linux Lab: Inspect and Change Your Own File Permissions
Lab title: Linux Access Control Fundamentals
Objective: Learn to inspect permission strings, set restrictive file permissions, and compare symbolic and numeric modes.
Required environment: A Linux computer, an authorised WSL environment, or a Linux virtual machine you are allowed to use.
Safety rules:
- Work only in your own dedicated practice directory.
- Do not use sudo or root privileges.
- Do not change permissions on system files.
- Do not change another user’s files.
- Do not run account-management commands in this lab.
- Check the current directory before creating or changing files.
Step 1: Create a dedicated lab directory
Run:
cd ~
mkdir -p permissions-lab
cd permissions-lab
pwd
Confirm that pwd displays the path to your own permissions-lab directory.
Step 2: Create a practice file
Run:
printf ‘This is my Linux permissions practice file.\n’ > permission-demo.txt
This creates a text file. If the target file already exists, the redirection will replace its contents, so use it only when you do not need to preserve an existing file.
Display its contents:
cat permission-demo.txt
Step 3: Inspect the current permissions
Run:
ls -l permission-demo.txt
Look at the permission string at the beginning of the output.
The initial permissions depend on the system’s default settings and the account’s file-creation mask, so your output may differ from someone else’s.
Step 4: Restrict access to the owner
Run:
chmod 600 permission-demo.txt
Now inspect the file again:
ls -l permission-demo.txt
The permission string should normally show:
-rw——-
This represents read and write permission for the owner, with no basic permissions for group or others.
Step 5: Change the permissions symbolically
Run:
chmod u=rw,go= permission-demo.txt
Inspect the result:
ls -l permission-demo.txt
The basic permissions should remain equivalent to mode 600.
Step 6: Allow group and others to read the file
For comparison, run:
chmod 644 permission-demo.txt
Inspect the result:
ls -l permission-demo.txt
The expected permission string is:
-rw-r–r–
This grants the owner read and write access and grants read access to group and others.
On a multi-user system, consider whether this is appropriate before using it for real information. For this lab, use only a harmless sample file.
Step 7: Inspect your user and groups
Run:
whoami
id
groups
Record the username and group information displayed by your environment. Results will vary by account and Linux distribution.
Step 8: Complete the lab questions
- What does r mean for a regular file?
- What does the numeric mode 600 mean?
- Which command displayed the file’s permissions?
- Which command displayed your user ID and group IDs?
- Why should you avoid granting every user write access to sensitive files?
Lab success criteria
You have completed the lab when you can:
- Find your own practice directory.
- Create and read a harmless text file.
- Explain the three permission categories.
- Change the file between modes 600 and 644.
- Interpret the permission string shown by ls -l.
- Display your current user and group information.
- Explain why access should be limited to the people and processes that need it.
PREVIOUS LESSON | NEXT LESSON